
The Heart of the Home
I'm excited to be talking about our kitchen today. Excited because it's the space we've transformed the most since we moved here but also because it's the space we have the biggest dreams for. I don't know all of the history on this kitchen, but from what I can tell, it was installed in the early 2000's. Here were the photos posted on the MLS when we bought it keeping in mind that a wide angle lens was used.


Truthfully, it's a nice kitchen. Storage is sufficient and the appliances were quite high end in their day. The countertops are a Cambria product, there's a nice deep stainless steel sink, under cabinet lighting, recessed can lights and some original details that make for an overall decent space. With all that said, I think it goes without saying that the space just feels dated. Aside from the wear and tear the kitchen has suffered (sagging hinges and gauges out of cabinet doors, appliances now nearing 2 decades old and making a lot of peculiar noises) the overall finishes and color palette fight with the aesthetic of this 1930's house. I would give my left hand to know what the original kitchen looked like.
We lived with this kitchen as it was for 8 months. During those 8 months, we were busy unpacking, painting and organizing the rest of the house and once those projects wrapped up - it was just me and this tile. I spend a lot of time in this kitchen and while my original plan was to not touch a thing as a means of motivating myself to work toward the ultimate goal of a complete remodel, I threw in the towel in month 9 and called my painter. It was the only remaining space in the house that we hadn't touched and living in this kitchen felt like being a visitor in someone else's home.
We devised a plan for a cheap and relatively painless refresher of the space to make it feel more like home until we can do a phase 2, larger scale remodel. We would:
Replace the tile backsplash
Remove a few cabinet doors to create open shelves
Have the cabinets professionally painted
Change out all the cabinet hardware
Change out the pendant light for something more period appropriate
The countertops also felt really dated but replacing them would have been more expensive than the project itself. We forged ahead with the hopes that eliminating so much of the warm tones in the room would help them feel more neutral and less beige.

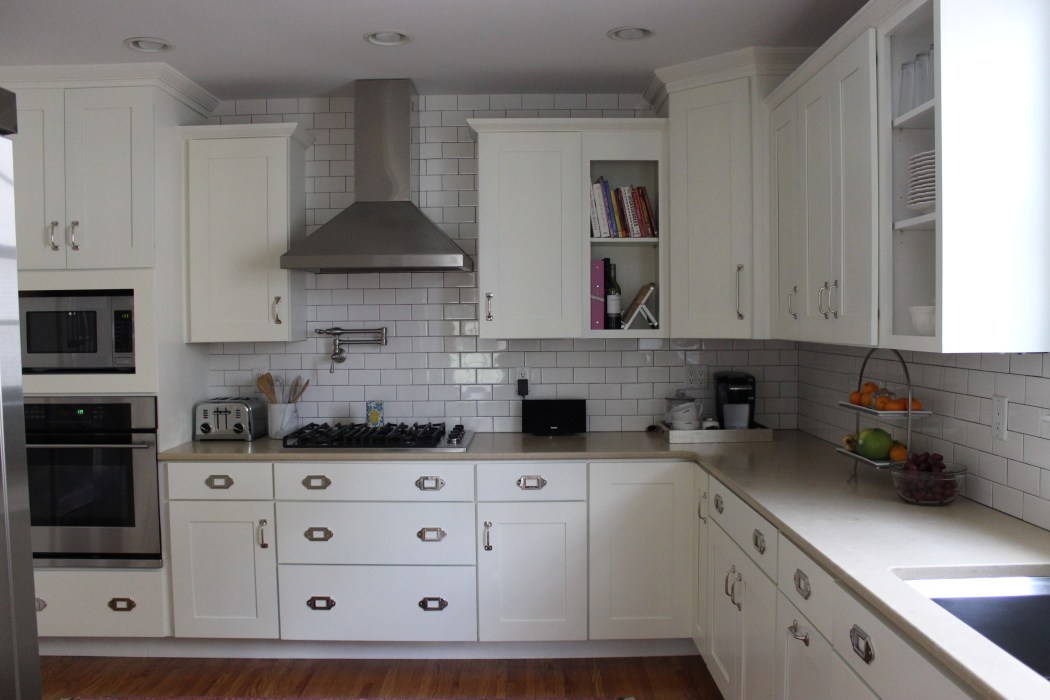
The first step was replacing the backsplash tile. When the kitchen was remodeled, the original plaster walls were replaced with drywall. This meant that it would be easier to cut out the drywall where the backsplash was vs trying to remove the tile without damaging the drywall. We knew we wanted to keep everything light and bright being that there is only one North facing window in the kitchen that gets very limited natural light. We bought the cheapest subway tile Home Depot sells and had the tile installed all the way to the ceiling.

What an amazing transformation. Carrying the tile up above the vent hood and cabinets instantly carries your eye up enlarging the space. We grouted the tile in charcoal grout with 1/8" grout lines for contrast. The subway tile fits with the age of the home and helped the modern shaker cabinets feel a little more classic.
As you can see from the before pictures, there were several cabinet doors with textured glass. There really didn't seem to be a rhyme or reason to where or why the glass was added, but it definitely wouldn't fit with the end vision of an older, more traditional kitchen. My plan was to replace the glass with clear glass but the wide rails of the cabinet door style still didn't blend with that idea. So we decided to take the doors off all together and paint the insides of the cabinets to make them feel like open shelves. There was already one randomly placed bank of open shelves on the adjacent wall and this helped to balance that and make it feel more intentional. I have to say, this is one of my favorite changes we made. These open shelves hold all of our most used dishes and glasses and considering the number of times I go through these in a day, my productivity increased exponentially.

Next came the painting of the cabinets. While painting cabinets is a much more pocketbook friendly option to replacing cabinets, it isn't always that much easier. Everything needs to be removed from the cabinets (or you can leave it in there knowing every single item will need to be thoroughly cleaned after). The prep work that goes into having cabinets painted is critical and the key to a successful paint job - sanding being one of those steps. The dust disaster aftermath is a pain but worth it in order to get a pristine paint job. Here was a shot of the kitchen in between coats of lacquer - gulp.

We moved out for a week while they prepped and painted and a few additional days while the house aired out and we dug ourselves out of the dust. All in all, the cabinets painted up really nicely and allowed the dings and divits that have accumulated over time to fade. The walls and ceiling also got a fresh coat of paint - everything being painted the same color to match the woodwork - Benjamin Moore Cloud White.
When it came time for replacing hardware, I allocated a bit more of my budget to be able to purchase something really special. These cabinet doors are an odd style - some really huge drawers that have completely flat fronts. In the before kitchen, you can see they had really long, modern pulls on these drawers - but wanting to keep with a more classic look, I needed to do some digging. That's when the idea of doing campaign style hardware came in to play. I came up with a surprising number of options and loved the idea of using the corner brackets as well (image via).

I ultimately decided on these pulls by Rejuvenation.

I liked that they gave the campaign look without needing to be inset. Adding the corner brackets would have looked nice, but isn't truly an authentic campaign look where the drawers would have recessed into the frame like such (image via):

So I settled for this campaign feel without being historically accurate. In kitchens, I like having multiple styles of hardware. It's a fun way to differentiate spaces in your kitchen without visual barriers. For example - a buffet or serving area could have a little more dressed up hardware than the working/prep part of the kitchen. In this case, I chose to use handles vs knobs. I like how they function and with the oddly wide rails of the cabinet door style, it helped break the space up more than a small knob would have. Taller doors got taller handles.

Next came the pendant light which I found locally at a little shop here in Edina called Rosie Posie. It was budget friendly at $79 and mimicked the lines of the dining room chandelier perfectly.

I knew I wanted to bring this Caitlin Wilson runner into my home somewhere and as the kitchen was taking shape, it was becoming more clear that a bold runner would be a perfect pop for the white canvas.

The pendant and rug really helped bring a classic and romantic feel to the space.


The rest of the details are just the everyday little things that make a house a home. A coffee station on a West Elm tray, my favorite Crate and Barrel marble utensil holder, my favorite toaster ever and a tiered serving platter that houses our fresh fruit stash. I must say, I'm amazed by the transformation. I find myself really loving this kitchen. It's the largest kitchen we've had to date and the layout of the appliances, the amount of counter space and storage - it all really works well. And now that it feels more like 'us', it makes hosting friends and family in the space something we can feel proud of - a reflection of us and a nod to the original character of the home. Here it is all lit up like a Christmas tree - which photographed terribly:

Though the kitchen looks, feels and functions more like us now, there's still plenty about it that can be improved (hello windows?) More to come on what a full scale remodel of the space might look like - hoping to post a video tour with all sorts of details soon.